Tuesday, October 28, 2008

Fall Leaves ... an under valued FREE resource

The fall parade is upon us and the trees are having their farewell moment in the spotlight as they display their fall colours and shed their leaves.

Composters Alert! Here is your opportunity to benefit from all the hard work done by others. On a Sunday afternoon, jump in your vehicle and cruise the neighbourhood. Look for subdivisions with leafy trees. I have a personal favourite.


I have no idea what they are! They are the first trees to bow out in fall with a magnificent display of sunny yellow. I anticipate and greatly enjoy the show every year, however, from a discerning composter's perspective, I appreciate the small compound leaves, that do not mat in the compost bin and break down quickly, contributing their carbon to the mix, just as much!

So now is the time to get out in your neighbourhood, late on a Sunday afternoon, and toss neatly packaged bags of leaves into you trunk! (If all is in your favour, it will not have rained for a couple of days before the homeowners decided to undertake this yearly chore and the leaves will be dry.) Collect what you might consider to be a year's supply for you to add to you compost with each new addition of kitchen waste. Such a mix will break down to give you a well rounded blend of nutritious plant food in a few months.

I have upped my year's supply to four bags. I find that is what I need to take me through until the leaves fall again next year. This year I had to resort to a bag of grass clippings, when I ran out too soon. Grass clippings are great if you are sure that your supplier has not added any nefarious substances, which I was not.


I acquired a pretty blue rain barrel with no lid which I will use this year to store two bags of leaves. That way the leave will be better ventilated and can dry out. I will open the top of the other bags to air them out as the the leaves are still damp. It is a good idea to punch random holes in the sides of the bag so moisture can escape. You want to avoid encouraging mold. The open top of the bag of leaves doubles as a great nest for friend Mottlee when he spends those cold, winter night outside, which he so seems to enjoy.


FALL BOUNTY:

I stopped at a huge fruit stand somewhere just out of Keremeos called Mariposa Orchards (250-499-2749) on the long drive back from Kelowna to Richmond about two weeks ago. I spent over an hour there inspecting the wonderful fall bounty - huge crates of multiple varieties of peppers, apples, pears, potatoes and onions. All kinds of pumpkins, squashes, gourds and translucent ears of popping corn in pale yellow and pink. A huge array of jams, jellies and honeys. The Okanagan is a bountiful indeed! What a feast for the eyes!


As I was planning a Fall Feast and celebration for my hubby's b/day a week later, I decided to stock up.


A Gift for my Feathered Friends:

Actually two gifts. I also bought a bottle gourd in Keremeos which I plan to dry, drill and turn into a bird house and make it avaialble as a FREE residence for a lucky neighbourhood couple to raise a little family.

I also purchased a wonderful large sunflower head, chock full of white seeds neatly packed in swirls around the sunflower's face. Have you ever looked closely at a sunflower's face? Inspiring and wonderous. Inspires hope in universal intelligence and creativity!

I pierced the back of the sunflower with a skewer and suspended it from a leather thong and hung it just outside the kitchen window where I can observe who comes for the seeds. I have not been disappointed. Despite the threat of two cats lurking about, two brave little chickadees have been flying in, and methodically removing seeds, one by one. Soon the sunflower will look like a Yin Yang icon. Half light, half dark.


Salad Greens:

The clay bowl of salad greens I replanted in early fall have grown but quickly bolted. All the cruciferous ('with four equal petals arranged crosswise')family - patchoy, etc, (or is it cole family?)seem to be aware that their days in the sun are short lived. The bees have been coming by and enjoying this small,late season supply of nectar. I also added some, not all (left some for the bees) of the flowers to a festive salad, they are quite sweet.


Fall is Bittersweet:

Every season has its gifts, bounty and beauty. It is a question of paying attention so one can see them coming.


Happy Fall!

Sunday, October 12, 2008


The Cucumbers

The cucumber seeds I planted on the 4th May, transplanted into the container on the outside of the porch railing, yeilded the first cucumber on the 3rd August. Three months to make a cucumber. I would consider growing cucumbers a success. The vine produced about 6 large crisp cucumbers in total. As each brahch grew longer and each successive fruit grew further along the end of the vine I would have to haul the strand up carefully to be able to harvest the cucumber dangling off the end. Reminiscent of Repunzel but I got a cucumber rather than a prince.

I like the lavish look of large cucumber leaves tumbling over the balcony railing.

Next year I might fix more containers to the outside of the porch and consider growing another variety of cucumber in one of them.

Cucumber pickles.

I went to a little class on pickling by Andrea Potter. We used a brine solution rather than vinegar. This allows for friendly bacteria to multiply and create the acidity. Eating these pickles adds probiotics to your gut. Pickling is a way to preserve surplus food for winter.

I bought young cucumbers from a local farm market and decided to try my hand. I found some wide mouth jars with tight lids at Valu Village. The bottles of pickling cucumbers sit on my counter and I am watching their progress. To date the saline solution has gone cloudy and the cucumbers which were originally jammed together have shrunk a bit and are floating a little higher in their brine. Occasionally I remove the lids and skim tiny floating islands of fluffy white mold off the surface and taste the brine. The acidity is growing and when it is to my liking, I will put the bottles into the fridge which technically should slow the bacterial activity. I will be sure to eat a pickle first before giving the bottles away to my pickle loving daughters .... just in case.


Another great find at Valu Village was an enamel sterlizing pot for making preserves. I bought it for $15! I was planning to make a green tomato relish but it just was not to be.

Tomatoes


I had better success with tomatoes this year. The buckets hanging from the fence eventually produced copious numbers of small, pear shaped, yellow tomatoes. They are a pretty addition to a salad ... scant acidity ... a bit "cottony" in texture but visually delightful. I mixed the yellow and red tomatoes to make cooked salsas with lots of cilantro to accompany scrambled eggs for Sunday brunch.


The tomato plant on the outside of the balcony was my "starchild". The tomatoes were tasty and I enjoyed the ones that ripened. I did not cover this plant with plastic with predictable results. This one plant was loaded with fruit of many sizes and the race between fast approaching cooler weather and unripened fruit was tight. I tried to speed up the ripening process by pruning off about half the leaves so as to concentrate the vital energy into ripening rather than growth and to expose the tomatoes to the weakening rays of the sunshine. That helped a bit. Got a few more ripe tomatoes before the blight struck. Grey, soft spots on the leaves, spreading to the stems and into the tomatos showing up as speckled brown areas on the surface.


As a last resort I amputated the limbs, removing all the green tomatoes that appeared unblemished and envisioned a sweet and sour green tomato relish flecked with red pimiento peppers. This looked like a positive outcome! ... particlarly when I came across the canning pot at Valu Village. Then the brown mottling surfaced on the salvaged green tomatoes and I conceeded defeat to the blight. The tomatoes went into the garbage ... I did not even dare to compost them.

Next year I will shelter the tomatoes on the balcony with plastic too.

The Potatoes

The fingerling potatoes are waiting to be harvested. I really want to make an occasion of the harvest. My plan it to accomplish a number of goals. I want to film the occasion as the final segment to the planting sequence filmed earlier in the year. I wanted to invite my young neighbours to join me because children bring new levels of delight to unearthing potatoes. To date I have done neither ... and the fingerling potatoes wait patiently under the soil

The potato plant was the visible indicator as to what might be happening underground ... I say might, because we may plunge into the soil with greath expectations, camera rolling and be sorely disappointed. So I can only hope that the lush, leafy growth above ground was worth the dead lawn in its shadow and we will uncover a generous proliferation of little brown nubs.

Pictures taken in August, September and October.


The "Watermelon for Everyone" was Nothing for No One:

In the enthusiasm of the moment, I invited two young neighbours to join me in planting a large tub with watermelon seeds. We enjoyed the ritual. They whispered promises of care and cast encantations and blessings for abundance and good health. We placed the pot, at the beginning of the summer holidays on my Chinese neighbour's front step (she gave me permission as they would be away in China for the holidays) where it would receive lots westerly sunshine. The plants grew lustily and we were filled with hope. I, of course, knew there was one fatal flaw in the effort. The seeds were planted much too late. The children however, faithfully watered the seeds and delighted in seeing way too may of them pop up through the rich brown soil. Steadily expanding over the rim of the pot and flowing slo-mo down the sides. We did get flowers and even four tiny pale green stiped, round "promises" before the first frost halted the process.

We had a discussion about what we learnt and next year we promised to start the seeds much earlier. Next year we will have watermelon for everyone.


The Big Carrots

As with the potatoes I am hopefull that there are large, straight carrots growing ever longer under the proud, green leafy plumes.


Fall is Upon Us


Fall is tinged bittersweet. The garden is going to sleep. The first to bid adieu is the hosta. The leaves are yellowing. The rest will follow in succession.


To temper the blow I have already invested in bulbs. Something to look forward to. Hope.

I like to envision little vignettes. I mix and match my bulbs according to the pictures on the boxes. I look at the "due dates" ... early, mid and late spring. I look at heights and imagine small, medium and tall then I planted them in layers in clay pots according to the size of the bulb. From the largest the deepest to the smallest the shallowest. I crown the lot with cheerful violas and place the pots where I can see them from the kitchen window and down the front steps.

When the drizzle drones on and grey clouds erase the memory of sunshine I will think of the bulbs and remember the promise of Spring!


Sunday, August 10, 2008

Summer At Long Last!

The Thumbelina Carrots
I finally harvested the Thumbelina Carrots on the 24th July. They took four months to reach maturity. One month longer than stated on the package. However I weighed the crop produced in an 8 inch round pot - a half pound of small, sweet carrots!
Not bad results at all.


So now I am going to be even more ambitious! On the 1st of August I filled a large 5 gallon (?) garden centre, black plastic pot with my potting soil mix and planted two kinds of full sized carrots - Chardonay and Red Nantes - not for any particular reason other than I had them on hand. I planted the seeds individually about one inch apart and they are already sprouted. There are about fourteen seedlings per pot. The height of the container should give them lots of room to grow downwards. We'll see what happens. Should get a late fall harvest of carrots. I have read that carrots can stay in the ground over winter and pulled as needed.


The Tomatoes
The tomato plant on the outside of the balcony is thriving! Lots of health leaves. The tomatoes are coming up. They seem to be a small variety of tomato. I see lots of flowers but I worry that all those flowers are not getting pollinated. I have noticed what looks like a small wasp visiting the flowers. I did resort, at on point, to playing cupid and used a Qtip to facilitate the process of spreading the pollen around. Tomatoes are growing. I am waiting for them to ripen on the vine. One fell off on its own and we ate it. It had that tomato flavour I remember.


The tomatoes in the containers at ground level hanging on the fence are growing well. You can tell that they are not getting as much sunshine, different varieties of tomatoes are coming up but not are ripe as yet.


On the 9th of August I decided to take no chances and covered the tomatoes downstairs with clear plastic. Brian Minter mentioned mid August onwards is when that the deadly fungus hits, the combination of cooling temperature and the occasional rain. I opened out clear garbage bags and pinned them with clothes pegs but did it in such a way so that it is opened on one side and there is lots of air flow.


I think we push boundaries trying to grow tomatoes in the Pacific Northwest. So we do so knowing it is risky business. Last year, here in Richmond, all our tomatoes were wiped out by fungus early in the season. I particularly felt for a Russian gentleman in our community garden who committed fully to growing only tomatoes both last year and this year. Lost every one. and this year too.


So, we water from the bottom, not the leaves. Clip the lower leaves so the spore, which are carried in the soil don't splash up on the leaves. We cut off the suckers growing in the axils or all the energy is concentrated into the main crop of tomatoes. The hope is that the tomatoes will have gotten to their full size and ripened before the first frost. In mid August we cover the plants with plastic to spare ourselves the disappointment of loosing all our patient work to rampant mold! All for the love of an organic tomato!

I went to the Tuesday Farmer's Market on Saltspring Island in the Straight of Georgia last week,the first week of August and their tomato harvest is in full swing. Lots of lovely ripe tomatoes. They seem to get more sunshine and they are also drier.


The Cucumber
Got one whole cucumber off the plant so far and lots of little cucumbers coming up.

Fall Plantings
Now is the time to get more seeds going for a fall harvest.
At the same time as I did the full sized carrots, 1st August, I did more arugula, West Coast and Provencal mesclun, spinach, a five variety lettuce mix, collard greens and Italian broccoli.


Strawberries
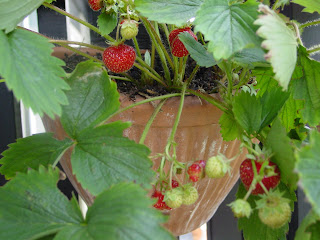
Good thing I used my Qtip on the strawberry flowers. We have strawberries! They are not growing in ideal conditions as they are in small half pots on the wall. They would probably do much better in a larger pot. They have a dense, fibrous root ball.


Summer Care of the Perennial Container Garden
The perennials were really starting to feel the heat towards the end of July. They let you know by dropping pathetically. So it is important to keep up with the watering. Water more frequently and deeply. No skimping! I usually water the small containers every two to three days or when I notice that the surface of the potting mix has dried out. I do find, however, that since I used coco fiber as the basis of the last batch of potting mix, it hold the water very well and I do not water as often. I try to keep up with the watering because I don't want to stress the plants out because it shows up in their growth. I aim for ... Thrive not Survive!


At the beginning of July, I dug into my one of my compost bins and harvested some lovely compost and added it to the surface of the pots as a mulch. That really gives the plants a boost. It keeps the root ball cooler, hold in the moisture and adds more nutrients to tide them into fall.

I also tidied up all the plants at this time. Deadheading the flowers, cutting off dead leaves and straggly stems. This refreshes the look of the garden as a whole and encourages a new growth spurt. So I am looking forward to another flush of new leaves and perhaps even flowers.


Compost
The garbage bin of compost that was full and left to digest at the end of March was ready for harvest at the end of June. That is three months to decompose down to compost.

When I emptied out the garbage bin into another container, I placed the container in the sunshine to encourage the worms to migrate downwards. Then I was able to remove the top layer of compost and put it to good use. I removed the compost layer by layer until the worms were in the bottom of the container. I then relocated the worms into a new garbage bin so they could take up residence and get to work chowing down on all those delicious veggie scraps.

Refinement to my compost bin
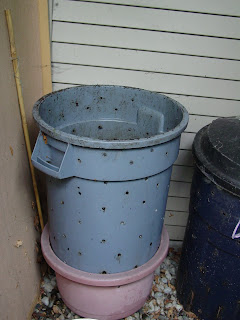
As I mentioned in an earlier entry, I compost in adapted plastic garbage bins. Up until this point none of them had holes in the bottom which meant that the compost tea would saturate the bottom of the bin and cause anaerobic conditions. Not ideal for composting. I recently acquired the perfect planter from a client that had no holes in it and bottom of garbage bin fits snugly into the top quarter of container. So I drilled drainage holes into the bottom of the garbage bin (and one in the top of the container, under the bottom of the garbage bin) so the compost tea can drain from the garbage and collect in the container. Now I can use the compost tea as a liquid fertilizer and aerobic conditions with be maintained though out the garbage bin. I will further improve the set up by settling the base of container into the gravel floor to stabilize it. At present the set up is top heavy making it awkward turning the contents with the garden fork.


Compost Teas
I have been using the Stinging Nettle and Comfrey and Compost teas as tonics for my plants over summer. This year I have fertilized with liquid seaweed, the layer of compost the teas and epsom salts which I added to the tomato plants to encourage flowering and fruiting. I have to keep my eye out for a source of comfrey leaves as I need to harvest more to replenish my supply.

Tuesday, June 10, 2008

Bringing in the Harvest

Mesclun
I have harvested the "Spice It Up" mesclun mix from Salt Spring Seeds, that I planted on the 2nd of April, three times so far and it looks like it might "come back for more".

I have planted two succession plantings of different combinations of mesclun - one on 17th May and one on 7th June. So there should be a steady supply of greens.

A local source of Liquid Seaweed
About two weeks ago Onami brought me two bottles of Liquified Seaweed Stock Solution made by Multi-Crop Industries Inc. a product from Cowichan Lake, Vancouver Island. ReindeersNatural@yahoo.com and I watered all the plants with this natural fertilizer to keep them going strong.

Harvesting Lettuce

I harvested from the lettuce bowl twice, once as cut and come again and yesterday I mowed down everything: all the lettuce, the individually planted kale, arugula and mustard and pulled up the rest of the radishes. I washed them all, drained them in a laundry bag and packed them into containers from EarthBound Organics Salad Greens.
I have been enjoying this ready supply of fresh greens in pita sandwiches and salads.


Carrot Tops Galore

The carrots greens look tall and health. They were planted about 60 days ago and according to the package should have been ready to harvest. I did pull out two to see what was going on under there and they looked about the right size for "Barbie". They tasted great, however. Nibble, nibble.


Local Weather Report

The weather continues to be rainy almost daily and today's temperature is 10 degrees C. Perfect weather for cool weather veggies like lettuces and other greens.


New Potting Medium

Well, not so new. Being from the West Indies originally, I think of the fact that the family, two generations ago owned a coconut plantation in Cedros. I think of all the potting medium we could have made and sold around the world out of all those discarded coconut husks! In those days the coconut fibre was used locally for mattresses and for door mats.

I was given a block of compressed coconut fibre to test as an alternative potting medium to peat. I placed the block in a storage container and turned the hose on it. By the time the block had broken up and absorbed the water (in no time at all) the 2.4 cu. ft. container was heaped high with loose, small particles of coconut fibre. I added a couple bags of worm castings and some oragnic fertilizer to the mix and am trying it as a potting medium. A couple things I like about this product is that it is an alternative to peat. Coconut fiber is a by product from the coconut industry which comes from underdeveloped countries so it supports their enterprises. It is a sustainable product as the coconut trees keep making coconuts. However it does need to travel far to get here. There's always a downside.


Hot Weather Veggies - What about them?!

Well, they are waiting and waiting and waiting in the wings. Getting long and lanky. Stretching to the sun if the sun won't come to them.


Potatoes

I planted out the pototoes in self watering containers. I read about them online and tried my hand at making them myself. The PVC pipe sticking up is where you aim the hose to fill the reservoir, the space between the two containers. Two holes are cut in the bottom of the inner (upper) container, one for the PVC pipe so it can enter the reservoir space and one for a funnel that sits in the hole with the end resting in the water in the reservoir. The medium packed in the funnel, wicks water up the end of the funnel, into the medium and is absorbed by the roots of the potato plant. Watering on demand. However so much water is falling from the sky that I have not really needed to fill the reservoir very often so far. There are two holes drilled in the side of the outer (lower) bucket at the height of the upper level of the reservoir which act as an overflow.


Tomatoes

As for the tomatoes they are planted out in olive oil containers and hang on the fence. They do get rained on which is usually a "no no" but as someone explained to me that becomes a problem when the temperature warms up in July (?) and the warmth and damp becomes conducive to molds. Then you have a problem! and they should be placed where they cannot be rained on. So the tomato plants are safe for now.


Notice that one of the containers is a self watering one. A good idea if the weather ever does warm up as tomatoes need regular watering in hot weather.

Sunday, May 18, 2008

One Month Later - 18th May 2008


The Cool Weather Veggies

The veggies I planted in early April have all sprouted and are coming along lustily!
We have already begun harvesting radishes ... so radishes take as little as six weeks
from seed to a harvestable size. We pluck them out as we need them. As they are planted very close together, this leaves room for the ones coming up to fill out. Radishes are so cute!


We have also trimmed the first three inches of salad greens on the 12th of May (just over five weeks)and eaten them. After harvesting I watered the plants with a weak compost tea so the plants would have the necessary nutrients to continue growing. They will be ready for another trim very shortly. Yesterday another pot became available and I planted a second round of mesulun - West Coast Market Mix. This is called "Succession Planting". When one planting has burnt out another crop is coming on line so there is a continuous harvest.

I thinned the Thumbelina carrots to give the roots room to develop. I sprinkled the surface of the medium with coffee grounds in an effort to fool the carrot rust fly. They lay their eggs and the larvae tunnel through the carrots. I have read that they pick up the scent of their favourite host, carrots, when the seedlings are thinned. Coffee grounds are an attempt to disguise the smell.


The lettuce mix is in a larger pot and planted quite densely. I removed a clump of seedlings and planted them out individually in the back yard flower bed. This should be a good place for lettuce as it is quite cool with filtered light, which lettuce prefer. These lettuces, planted in the flower bed, will grow to their full size. The densely planted lettuces in the large clay pot can either be mowed down with a sissors and added to the musclun salad mix or I can harvest individual outer leaves from as many lettuces so as to satify the amount of lettuce I need for the meal. A method now refered to as "Cut and Come Again".. In that way the plant continues growing. I make sure to water the lettuces regularly as they become bitter if the weather becomes too hot and they are stressed by a lack of water.

The Strawberrys

The strawberry plants are being harrassed unmercifully by aphids and thrips. I have sprayed with water and a few added drops of non-toxic, biodegradable dishwashing liquid on two occasions so far and it appears I will have to continue to do so. I see lots of flowers, which is hopeful! I make sure to water the strawberries regularly as they are in quite tight quarters. I also added a teaspoon of epsom salts.

Epsom Salt, magnesium and sulphate, are important trace nutrients in the production of fruit and flowers. I will up the quantity to 1 tablespoon per liter in the future. Visit www.epsogrow.com for more information.


Mix 1/2 cup per gallon of water; then water with mixture at your normal rate every four weeks. For added benefit, lightly spray leaves with a mist of this solution every time you fertilize with Epsom Salts.

Warm Weather Veggies

We had two glorious days of sunshine so far this weekend. On Saturday the thermometer placed against my living room window topped 42 degrees C without a breath of air to boot! The Nasturtiums seedling in the hanging baskets at our entrance literally seem to have stretched in that one hot day!

On the 15th of May I made the rounds of various greenhouses and bought a few warm season veggies: three varieties of hot peppers, soy beans for edamame, walla walla onions and a few cabbage which need a long growing period. Buying seedlings gives plants a jumpstart so they can have enough time to come to fruition before the sun disappears over the horizion. I have successfully grown a wide range of seedlings from seed on a south facing window in the past. However there is no south facing window in this townhouse so I won't waste my time to try and start seedlings indoors under these conditions.

I will be planting the warm weather veggies in my community garden plot where the southern orientation is favourable to taking full advantage of growing summer veg.
I will also be direct seeding in the community bed so I will have succession plantings.

I started a few warm weather veggies on the 4th May: broccoli now 3" tall, a beautiful white pumpkin with gorgeous thick orange flesh. I saved the seeds from a pumpkin I ate last year and a 2' cucumber called Salad Bush recommended as good for container growing. I water the seedlings with compost tea as they are in small cells and I don't want them to run out of nutrients before I can get them in the ground.

Something New for the Entrance to the Townhouse

Every year I seem to get a new inspiration for the front staircase. This year in honour of the thrust in growing veggies, I have planted a combination of purple skinned kholrabi (which I find visually interesting - little smooth skinned globes on skinny pedestals and a shock of leaves) with "Siam Queen basil" purple tinged leaves and green leaved bush basil and orange calendula flowers (the petals can be added to salads as can the nasturtium flowers and leaves - peppery!. That is one pot. The other pot has "Red Sail" lettuce - red tints on crinkled green leaves with deep green, bold Collard Greens and orange nasturium flowers. I will be interested to see the result!

Monday, April 7, 2008

Welcome to my Balcony Garden

7th April 2008 - Richmond, BC

I am creating this blog in case it is helpful to others and so I have a record of the garden's evolution.

I began this balcony garden in 2005, so this is the third seasonal round. I did it because I wanted to look out of my kitchen window and see beauty and because living in a town house, the postage stamp garden is part of the common area and under strata regulations.

The success of the garden so far is the due to the initial planning stage that took into consideration what would be necessary for long term success: large containers, taking care to select plants who's needs matched the conditions (eg. hours of sunlight) available on the balcony.


The Role of Compost

I cannot stress enough the importance of compost for the continued, long term success of my garden. I turn out about 4 batches of compost a year in modified, inexpensive, plastic garbage bins. The compost is from the waste generated from food preparation in our kitchen.

I have a compost centre, downstairs under the balcony overhang. Everything I need to compost successfully and produce balanced compost is on hand in about a 1 meter by 2 meter area. I add compost during each season. In winter as a mulch to protect the plants from the cold. In spring so the new growth has the nutrients it needs to flourish. In summer as a mulch to preserve moisture in the soil. In fall after the fall clean up, in preparation for dormancy.


Spring on the Balcony

The Spring Parade starts early on the Balcony. First up are the residents of my "winter" container. Most the plants in this box are evergreens ... they have a presence year round. This is the container that is visible year round from within the home, so I selected plants so that box always looks alive and active. First up, probably as early as February, was the Hellebore flowers. Ninteen stems in all, each with a number of flowers. Now the flush of large new leaves are emerging.

In a neighbouring container the four little daffodills sent up a flower each and the Brunnera slowly is emerging with netted blue grey leaves and clusters of tiny sky blue flowers.


Caterpillars Be Warned


I must say that I have been most anxiously awating the emergence of the scarlet, baby leaves of the Japanese maple tree. Every year so far, the tree is invaded by leaf rolling caterpillars that devour the first flush of leaves. Perhaps I should let the caterpillars have the first set of leaves but I won't. I have sprayed with BTK, a bacterium that infects and kills the caterpillars when they eat the leaves. BTK is made by Safers and is considered an organic method of pest control.

The "spring" container, which you have to go out onto the balcony to see, already looks lovely. The Bergenia and the tiny yellow and green leaves on the variegated honeysuckle (lonicera), both evergreens, have been maintaining a pretty presence. The bergenia with large deep maroon leaves coloured by the cold. A few weeks ago it pushed out sturdy stems of hot pink bells. The Jacob's Ladder began emerging feathery leaves in early March followed more recently, about the end of April by the fernlike, leaves and tall flower stalks of the Bleeding Heart.

Then the small clay pots on the railing hold the white violas that preformed valiently all winter long but really took off as the temperature began to warm up. Slowly the tulip and daffodil leaves, planted last fall, began pushing though the thick layer of compost and fortuitously the scarlet of the emerging tulips understoried with white violas, backdropped with flowering pale pink cherry blossoms and matching scarlet Japanese maple leaves in the foreground all combined, by happy serendipty to create a pretty picture.


Starting Veggies


Some vegetables tolerate cooler weather well and some actually prefer it, such as lettuces, spinach, radishes and chinese vegetables. I have to say I am no expert at growing vegetables and am in a steep learning curve at the moment. I started the first year with herbs. The second year with potatoes grown in buckets for a children's program. Last year with lettuces and salad greens and figured that I this year I would let fly and see all the different things I can grow.

To date I bought some inexpensive clay bulb pots, which have straight sides so the top and bottom circumference are the same. In them, on the 4th of April, I planted spinach, beets, radishes, swiss chard, carrots and salad greens seeds. I have placed a clear plastic bag over each pot. The bags are held aloft with a bamboo skewer, so the rain from spring showers we are having, run off. The bags help to temper the temperature fluctuations and keep an even moisture level. I will remove them as the seelings begin to germinate and get strong.


Potting Soil

I use my own mix of potting soil. I mix a base of peat moss with compost, vermiculite and organic fertilizers and store it in inexpensive garbage bins in the garage. Whenever I need potting soil it is available in quantities.

Planting seeds is very simple. Others might have a better strategy but what I do is, I put a square of black landscape cloth over the pot drainage hole so the soil does not wash away and usually a curved shard of pottery to keep the hole clear so water can drain. I fill the pot with potting soil (the level will settle) and I scatter small seeds over the surface then sprinkle more potting soil over the seeds. I then water them with the spray hose in the kitchen sink (though rain water is better). It has a gentle spray which minimizes the seeds floating away. Larger seeds like swiss chard I place individually and push down about 1 cm into the soil.


A Lesson Learned

It seems that ensuring there is adequate moisture for the germinating seeds is key. I recently planted up three trays of lettuce in small individual cells and not one germinated. The diagnosis seems to be not enough moisture at a critcal point of seed germination.


Dealing with Unwanted Visitors

I like having visitors to the garden. Little snails visit, grazing on the algae growing on the clay pots. They are very cute. If they begin muching on leaves though the welcome mat is withdrawn and they are tossed overboard.

Aphids appear in droves every spring. Usually they congregate on the new shoots sucking the sap from the tender tissue. I keep them on their toes by wiping them off by running my fingers along the stem and then crushing them or spraying them with a blast of water.

At present, I notice that thrips are gathering on the strawberry leaves. They are also sap suckers and will weaken the plant so I may spray with soapy water.


Pollination

I have had very poor results with the strawberries. My diagnosis is that the flowers which the three plants produce readily are not being pollinated. So I am going to test this theory and cross pollinate them myself, spreading pollen around the flowers as they open with a Qtip. I have also been very generous with the compost and I drenched them with a foul smelling tea made from comfrey leaves so they cannot say they are not well fed.


Other Methods of Adding Nutrients to the Garden


Happily in summer of last year I came upon a large and lush patch of comfrey growing wild at the community garden. Comfrey (and nettles in spring) can be soaked in water until they decompose and the resulting putrid smelling "tea" can be diluted and used to add extra nutrients to plants. From what I read, comfrey plants have very deep roots and pull up minerals from deeper in the soil. Those nutrients, stored in the leaves then become available in the tea. I love using these "free" resources whenever possible.